Gallery

Showing posts with label miter. Show all posts

10 October 2011

Embrace scroll shelf brackets-Part5 final

Hello Everyone!

Well this is it...the final part to this project! The next part will be when I reveal the finished product! So please make sure to return for the reveal.

After a trying glue-up of the bracket parts, I cut some slots in the miters for splines. These splines will further strengthen the miters. I cut the slots using a shop made sled which helps me slide the brackets safely over the running saw blade.

Gluing the splines in place. I used some of the left over oak  and sized them to fit the slots exactly. 

Trimming the splines flush using my appropriately named flush-trim saw. I love this saw!

The most exciting part is applying the first coat of finishing oil and seeing the wood just come alive (bracket on right)!  Here I'm applying a few coats of a durable Tung oil finish.


I will give the oil finish a few days to cure and then I will send it off to my client. 

Please check back in for the reveal!

Thanks for looking!
Roshaan

05 October 2011

Embrace scroll shelf brackets-Part4

Hi Everyone!

Well we're almost there! Today I have been busy attaching the hanging hardware and routing a small cove profile on the edges of the mitered parts.


Using a mortising jig to rout out the exact shape of the blind  keyhole hanger I'll be using to hang the brackets . I have to place two hangers for added strength and therefore the two will have to line up precisely . I added a couple of stops to the jig to ensure perfect alignment of the two hangers.

The freshly cut recesses for the hangers. Now all I have to do is drill some clearance holes for the heads of the screws.

At the drill press equipped with a 3/8" diameter drill bit, drilling the clearance holes for the head of the screws . 

Routing a small cove profile to the edges of the mitered parts. This will complement the scrolls quite nicely and it also breaks up the hard square edges of the mitered parts. Here I have butted two boards together to create a more stable base for the palm router.  

A close-up of the cove profile. 

Thanks for looking!

Roshaan

13 July 2011

Custom Orchid Picture Frames - Part 4

Hi Everyone,

Welcome back to part 4! We're almost there!


Here I am getting ready to rout out a recess for the key hole picture hanger.  I choose to  use one hanger
instead of two since it will be easier for the client to hang on the wall. I made a template out of mdf to get
a nice tight fitting recess. 

The routed out recess...we're not done with it just yet.

The recess cleaned up with the template removed.

To complete the recess, I drill some clearance holes for the head of the screw when hung on the wall.
Thanks for looking!

Roshaan

12 July 2011

Custom Orchid Picture Frames - Part 3

Hello,

Welcome back for part 3! I am having so much fun with these frames! 

Now that I have cut the interior orchid and the window of the frame, I carefully remove the top cut-out with
a putty knife. This is a slow process, but it is the safest way I can think of.

I then use the table saw and miter gauge to cut miters on the back parts of the frame. These parts will help to  provide clearance of the picture turns

I glue the mitered parts to the back of the frame, making sure to use cauls to fully adhere the parts. To make the glue up 
go smoothly, I first glue each opposing corner, then complete the glue-up by bringing these two corners together at a later stage.


A detail shot of the miters.


Thanks for looking!

Roshaan


12 March 2011

Raven inlay Jewelry and Make-up Boxes-Part 9

Hi Everyone,


It's hardware time! This is a true sign that we are getting very close to the finish line. In this part I will be installing the hinges, the chains etc. and I will also start construction of the upper trays.


I usually cut the shallow mortises for the hinges using a hand held router and then square the lines with a sharp chisel. This time I'm trying something new. I'm using a router table with stop blocks on either side of the router bit, to control the length of the cut, which precisely fits the hinge leaves.


Notice that the router bit leaves a round corner? I simply use a chisel to square the corners to fit the hinge better.


I also went ahead and installed the chain to keep the lid from flopping backward. Since the box will have an upper tray, I also attached some wooden risers on the interior of the box. Notice the rabbet cut on the riser on the chain side of the box? This rabbet will act as a stop, which will prevent the tray from sliding side to side and hitting the chain.


The trays will have simple mitered corners with splines for reinforcement. At the table saw with the blade tilted at 45 degrees to cut the miters.


A closeup of the grooves I cut to house the bottom panel of the tray.

Please join me next time for part 10 when I will be constructing the dividers of the trays.

Thanks for looking!

Roshaan


03 November 2010

Alberta Rose Recipe Box - Part 2

Hi All,

The joinery has begun on the recipe box! After I cut the parts to length, I made a simple finger joint jig, which easily attaches to the table saw miter gauge.


The jig is made up of a hardwood pin which sits into a notch of the same thickness made in the miter gauge auxillary fence. Although the jig is simple to make, it is very critical to get all the elements to allign. To get successful results it is important that the pin, the space in between the blade and the pin and finally the dado stack is the exact same width. Any variation to any element will result in the joints being too loose or too tight.

Another critical part is to make sure to clearly and carefully mark which way is up, sideways bottom, top...well... if it is something that will help you with the orientation of the piece mark it! It is very easy to get all the parts confused and cut a notch where a pin should be. Believe me this leads to some choice words with yourself about yourself!


I first start by cutting a pin on the edge of one part by butting the board up against the hardwood pin of the jig as seen in the second photo from the top. After this board is completed, I then start on the corresponding corner of the next board with a notch. I simply use the first board to create the space in between the hardwood pin and the dado stack and then butt the second board up against it. And so on.
After all the finger joints were cut, I then proceeded to cut the grooves at the top and bottom edges of each piece. I had to keep in mind the placement of each pin and notch.
If there was a notch I could simply run the piece right over the blade to create the groove, because the groove will be hidden by the pin. However if there was a pin, I had to cut a stopped groove, because unfortunately this groove can't be hidden. You will be able to see in on the outside face of the box. See detail photo above.
Well, that's it for this part. Come by next time for part 3!
Thanks for looking!
Roshaan


07 October 2010

Heather's Netbook Cherry wood box-Part 4

Hi Everyone!

The project is really coming together! In this part I will be finishing the top and bottom of the box.


The above photo shows the box basically cut right in half. Notice the little lip that was left during the cut. I got rid of the lip by using a block plane to flush up the edges. I then further cleaned up the edges by sanding it with various grits of sandpaper. Rather than bringing sandpaper to the piece I brought the piece to the sandpaper. I made a sanding base by using a true and flat surface and a full sheet of sandpaper which I attached to the base using temporary spray adhesive.


Remember the panels for the top and bottom I was working on in the first part of this project? Well, since then I cleaned up the panels with various grits of sandpaper and cut it to size using my invaluable shopmade miter sled. Every woodworking shop needs one of these. If made properly, this one tool can yield great accuracy.

After the panels were cut to size, I cut a slight bevel on the edges of the panels. This will give an all around nice reveal as well as prevent the edges from snagging on anything causing aweful chip out.
I then used a couple of spacers to hold the panels in place while the glue sets up. Notice the nice reveal created by the cutting the panel about 1/4" smaller than the inside surface to the top and the bevel further enhances the reveal. I used a maple substrate to create the nice contrasting reveal. This reveal will also complement the contrasting maple splines on the corners of the box.


Bring on the clamps!!! You can never have too many clamps!
In the next part I will focus on installing all of the box hardware. We are almost there! So, join me next time for part 5!
Thanks for looking!
Roshaan


06 October 2010

Heather's Netbook Cherry wood box-Part 3

Hi Everyone!


In this part I will be focusing on strengthening the mitered corners of the box. I favour using contrasting splines on the corners, not only for strength but for aesthetics as well. I will also illustrate the method I use for separating the lid from the bottom of the box.


To safely cut the spline slots on the box corners I used a shop made carrier that cradles the box securely while it slides agaist the table saw fence and over the saw blade. I simply used the thickness of the saw blade or kerf of the blade, which is usually about an 1/8" thickness.


Since the spline slot is an 1/8" thick, I also made my contrasting maple splines the same thickness. There are variables in play when you are dealing with multiple cuts such as these. Sometimes the vibration of the blade or maybe the movement of the box in the carrier could make the slot wider or smaller. Therefore I always individually fit each spline to each slot and I glue the splines into the slots one at a time.


After the glue dried, I used a flush trim saw to trim the splines, just proud of the box surface. I then flushed up the splines with a chisel using a paring cut. I then sanded the box sides with various grits of sandpaper to a smooth finish.

After I cleaned up the sides of the box, I separated the lid from the bottom using the table saw. This is a great method, when the box lid is flush to the box bottom. There is no way the lid will line up to the bottom when you attemp to build each assembly separately. Since the lid and bottom of the box was the same height, I simply found the center of the sides and split the line in half on the saw blade. To prevent the parts from binding as it comes apart, I did not cut the sides all the way through. I left a little bit of a lip to help keep the box together.


After all the sides were cut in half, I carefully split the box using a hand saw. I took extra care on this step, since I did not want to cut and ruin the edges.
Wow, this project is going by fast! Please stay tuned for part 4!
Thanks for looking!
Roshaan


02 October 2010

Heather's Netbook Cherry wood box-Part 2


Hi All,

In this part of the project I will focus on the assembly of the box. I will discuss cutting the grooves into the box sides and the method I use to glue up the box. So please join me for part 2!


After the miters were cut on all side pieces of the box, I returned the blade to a 90 degree angle. I then set up the blade to the exact width and depth of the grooves to be cut into the top and bottom edges of the sides. These grooves will house the top and bottom panels of the box. I always make sure to make test cuts into an extra piece first, to fine tune the fit of the panels into the grooves. After I found the perfect fit, I then went ahead and cut the grooves into the finished pieces.

Before any glue-up I dry fit all the pieces to see if everything is fitting as it should. The easiest and most effective method I use for assembling miters is the clear packing tape method. First I lay all the sides with the miters facing down on a flat surface. I then butt all the corresponding miters end to end. With the pieces of packing tape already cut to length I then place a piece of tape firmly over each joint also making sure the top edges are lined up. Then I flip the assembly so that the miters are now facing up. I spread glue onto all the miters, but before I closed the joints, I inserted the panels.


I then proceed to wrap each miter onto the next to close all the miters around the panels as seen in the above photo. You might ask yourself, but what about accessing the inside of the box? Well, I have a great trick to seperate the top from the bottom at a later stage.


For extra clamping pressure, I use a band clamp. I then set the assembly aside to cure for about 30 minutes.
In the next part, I will concerntrate on the corners of the box, so stay tuned for part 3!
Thanks for joining me!
Roshaan


30 September 2010

Heather's Netbook Cherry wood Box-Part 1

Hi Everyone!


Welcome to part 1 of my new custom request! I love custom pieces, simply because it keeps me on my toes and sometimes it throws you some pretty wacky curve balls. It also gives me great pleasure to know that it will be treasured and well used by my clients for many years to come.


Well, let's get started!


I honestly believe that the process is just as important as the outcome. Therefore I take great care in the preparation of any project. I first start with a drafted drawing as you all know, but I also start with a list of steps or tasks to be completed and in the exact order it needs to be completed. I call it my flow chart. I do this to keep the project in line and on time.

Speaking of which the flow chart for the box told me to first make a panel wide enough for the top of the box. This consisted of gluing up 3 separate boards of wood edge to edge to make the panel large enough. I simply used masking tape to join the boards. I then flipped the assembly over and exposed the seam, by simply using a wooden screw clamp to keep the seam open.


I needed to keep the seam open, so that I could apply some glue to the joint as seen in the above photo.


After the glue was applied, I simply removed the clamp to close up the joint. See the nice bead of glue squeezing out of the joint? This illustrates a successful glue-up! Since I have 3 boards to glue together, I waited for the first pair to cure, before I was ready to glue the final board.


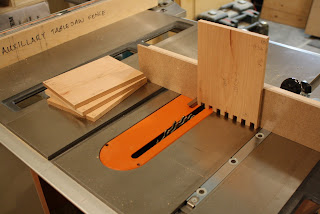
While the glue was setting up on the panels, I then turned my attention to the box sides. I cut the miter joints on the box sides, by using a table saw with the blade tilted at a 45 degree angle. I cut a miter on one end of each side first and then clamped a stop block to miter the sides to the exact same length.

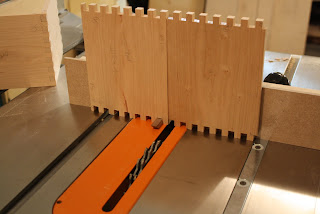
Before I went on to the next step, I did a dry-clamp of the box sides to evaluate the fit of the joints. Everything looked good, so now I was ready to move on...but you'll have to come back for part 2 :)
Thanks for looking!
Roshaan

10 September 2010

Cherry Blossom Sideboard Part 6

Hi Everyone!

Welcome to part 6 of the Cherry Blossom Sideboard! For this part of the project I concerntrated on building the two sliding frame and panel doors. I also cut a slight bevel on the top.


Since the doors are a fairly large size I had to make sure the joinery will be strong enough to withstand the sliding motion of the doors. First I started with beefy frame members which housed a large panel. In a later part I will overlay the cherry blossom scroll sawn panels onto the finished frame and panel doors.
I then decided on a bridle joint for the doors. This joint is essentially an exposed or open ended mortise and tenon joint. To cut this joint on the table saw, I used a shop made jig equipped with a toggle clamp to safely and securely hold the piece in place, while it is slid over the saw blade. I first started with the mortise or in this case the deep slot, as pictured above.
I then used the same jig to cut the tenon, making sure to measure the slot carefully for a snug fit. This jig is an invaluable and very useful addition to any woodworking shop.

After I cut the bridle joint I proceeded to carefully measure the exact thickness of the panel and transfered this measurement onto the frame members. Using the table saw I cut the grooves on the inside edges of the frame members to receive the center panel. The above photo shows a nice detail shot of one corner of the door assembly including the center panel.


After I was happy with how the door came together during the dry fit, I finally glued and clamped the door.


I also cut a slight bevel on the top to add a nice detail to an otherwise flat rectangular slab of wood. Before I cut the bevel I had to cover the exposed edges of the plywood with 3/4" thick hard maple. I mitered the front corners of the edging for a seamless wrap. The back corners of the edging are simply butted together, since the back edge of the top was not beveled.
In the next part I will assemble and glue the carcass of the sideboard. I will also cut some handy [get it :)] finger pulls in the doors and finally taper the legs.
Phew! We are ALMOST there!
Thanks for looking!
Roshaan