Gallery

Showing posts with label sideboard. Show all posts

19 June 2011

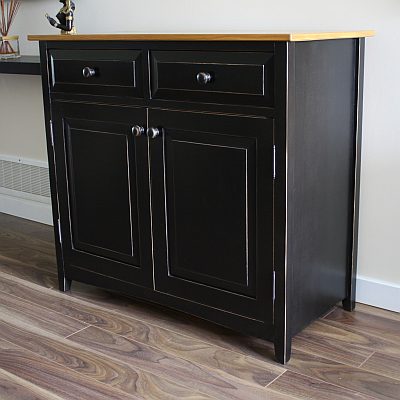
Chic country style cabinet

Hello,

I apologize for my gross neglect for the past few weeks! However, I am back now and I have a few photos to share with you of my newest project. The project is completed and hopefully happily sitting in my clients home. I do have reveal photos to share, but I would like to hear from you if you would like to see some in progress photos. So, if you do please let me know :)

So I present to you... the chic country style cabinet! Enjoy!

22 September 2010

Cherry Blossom Sideboard - The Reveal

Hi Everyone!

Delivery day! The sideboard is now sitting contently in the clients home :) All the photos were taken there.


Thanks for coming with me on this journey!
Roshaan

10 September 2010

Cherry Blossom Sideboard Part 6

Hi Everyone!

Welcome to part 6 of the Cherry Blossom Sideboard! For this part of the project I concerntrated on building the two sliding frame and panel doors. I also cut a slight bevel on the top.


Since the doors are a fairly large size I had to make sure the joinery will be strong enough to withstand the sliding motion of the doors. First I started with beefy frame members which housed a large panel. In a later part I will overlay the cherry blossom scroll sawn panels onto the finished frame and panel doors.
I then decided on a bridle joint for the doors. This joint is essentially an exposed or open ended mortise and tenon joint. To cut this joint on the table saw, I used a shop made jig equipped with a toggle clamp to safely and securely hold the piece in place, while it is slid over the saw blade. I first started with the mortise or in this case the deep slot, as pictured above.
I then used the same jig to cut the tenon, making sure to measure the slot carefully for a snug fit. This jig is an invaluable and very useful addition to any woodworking shop.

After I cut the bridle joint I proceeded to carefully measure the exact thickness of the panel and transfered this measurement onto the frame members. Using the table saw I cut the grooves on the inside edges of the frame members to receive the center panel. The above photo shows a nice detail shot of one corner of the door assembly including the center panel.


After I was happy with how the door came together during the dry fit, I finally glued and clamped the door.


I also cut a slight bevel on the top to add a nice detail to an otherwise flat rectangular slab of wood. Before I cut the bevel I had to cover the exposed edges of the plywood with 3/4" thick hard maple. I mitered the front corners of the edging for a seamless wrap. The back corners of the edging are simply butted together, since the back edge of the top was not beveled.
In the next part I will assemble and glue the carcass of the sideboard. I will also cut some handy [get it :)] finger pulls in the doors and finally taper the legs.
Phew! We are ALMOST there!
Thanks for looking!
Roshaan


30 August 2010

Cherry Blossom Sideboard Part 4


Hi Everyone!
It's been quite a busy week in the workshop. I've made some great progress with the sideboard, as you can see in the photo above. The sideboard is finally taking shape! I have cut dadoes in the top webframe and the bottom piece on center to receive the center gable. I have also cut dadoes in the center gable itself to receive the two shelves.
Since this piece will be stained with a combination of a nice rich walnut dye and a dark ebony stain, I had to consider the natural wear pattern of opening and closing the sliding doors and how it will effect the stained surface. Since the piece is made out of maple which is a lighter color wood, the wear will show stark contrasts between the dark stain and the maple. To solve this issue, I opted to use a darker wood such as a rich walnut for the tracks. This way if the stain is ever effected by the sliding doors, the contrast won't be so visible.
To attach the sliding door tracks to the upper webframe and the bottom piece I used biscuits and glue to make for a strong and solid joint. Biscuits are football shaped wafers (not the eating kind) which are made out of compressed beech wood and when it is glued into a corresponding slot, it swells up to make for a very strong edge to edge joint. To cut these matching slots, I used a power tool appropriately called a biscuit joiner or sometimes refered to as a plate joiner, as seen in the third photo.
After the tracks were glued I had to notch the ends of the tracks to fit around the stopped rabbets and dadoes which was cut into the side assemblies. Since the panels were too large to safely cut the notches on the table saw, I simply cut them by hand. For accuracy I made a very simple
right angle jig which I then positioned on a layout line and clamped to the panel. I then used a flush trim saw to cut out the notches. A simple yet very effective method for cutting notches by hand.
In part 5 I will be cutting the grooves into the tracks for the sliding doors. I will also make a template for the curved bottom rail and use this template and a router to shape the curve.
Thanks for joining me for part 4, stay tuned for part 5!
Roshaan


22 August 2010

Cherry Blossom Sideboard Part 3


Hello All,

Since I completed the side assemblies in part 2, I was now ready to cut some stopped dadoes ( grooves going across the grain) to hold the bottom and the middle shelves... and rabbets ( a long notch at the top edge of the side assembly) to hold the sub-top.

For this operation I used a hand held plunge router. Since accuracy is very important I had to come up with a way so that these dadoes and rabbets will line up precisely in both pieces. I simply ganged and clamped both sides together, so that I can set up a fence across the whole assembly to rout out perfectly alligned dadoes and rabbets (as seen in top photo).

With a little fine tuning the shelves and sub-top fit quite nicely. The last photo shows all the completed cuts in both corresponding sides. The next step will be to rout a rabbet along the back edges of the sides and top and bottom to receive the back. I will also cut some dadoes into the top and bottom pieces to receive the center gable or divider. Be sure to tune in next time for part 4!

Thanks for looking!


Roshaan

19 August 2010

Cherry Blossom Sideboard Part 2

Hello Everyone,

Well, I am making some progress on this project. I just completed the side assemblies, which consists of the legs, the top and bottom rails and side panels. I used mortise and tenon joinery to attach the rails (the horizontal top and bottom parts) to the legs and I then went ahead and cut a 1/4" deep groove into the legs and rails to receive the side panels. Since the panels and the rails were both 3/4" thick I had to cut a rabbet (notch) along all the edges of the panels to fit into the 1/4" thick groove. This also adds a nice reveal on the outside of the assembly.


The series of photos shows the steps in the order that it was completed.
The top photo shows all the parts layed out exactly how it will eventually be
assembled and glued together. The second photo shows the detail of the joinery including the rabbet along the edges of the side panel. Below that we have a photo of the glue-up of all the parts. I use t-stands to elevate the assembly, for easy gluing and clamping. And voila!...we finally have the side assembly of the sideboard. I will eventually taper the legs after I have cut all the joinery on the inside face of the side assemblies.

It truly is a great feeling to see the outcome of a whole bunch of parts scattered on your bench! I am sure that most woodworkers will agree when I say that the glue-up is the most stressful part of any woodworking project.

But we all love the rush!
Roshaan


17 August 2010

Cherry Blossom Sideboard - Part 1


Hi All,

As promised, I have been taking in-progress photos of the cherry blossom sideboard build to share with everyone. With any project, especially a large build, organization and preparation is key to the success of it's outcome.
I always start with a detailed drafted working drawing to work out any of the joinery, measurements and proportions before I even
touch a piece of wood. I then like to make a scale model of the piece
to see what the full sized piece would actually look like and to work out any issues with proportions.
After I am satisfied with the proportions of the piece I then go ahead and make a cutting list of materials, which will include the size of all parts, the type of wood to be used and the joinery to be used. I then take these measurements and physically "map-out" or layout each part on the appropriate piece of wood. For example if I use veneered sheet goods (a fancy name for plywood) as seen in the above photos, I use a large square and draw the size of the part with a pencil right on the sheet of plywood and I mark each part. This way I minimize waste.

Before I cut into solid wood, I also let the planks acclimatize to my workshop for at least 3 days to a week if possible. Notice the way I have the project lumber stacked up on my bench with scrap pieces of wood in between each layer. This is done so that the underside of the boards will also receive appropriate airflow.
I also make sure I have my working drawings and cutting list on hand at all times. This will avoid any confusion and waste of materials. And remember to always measure twice...or three...or four times and cut once!

Roshaan


10 August 2010

Cherry Blossom Sideboard

Hello Everyone!

I am embarking on a new project and I am excited to give you an inside look at the progress. It is essentially a sideboard with two sliding doors and these sliding doors will have a cherry blossom motif scroll sawn into the panels. It also has a modern asian appeal, with tapered legs, beveled top and a "rising cloud" curved bottom rail. I have been asked to design and build this piece to hold piano books, which of course has a particular size which had to be considered. My client has been searching high and low for the right piece with no success. She finally contacted me to see if I could come up with a suitable design. After weeks of mulling over the details of the piece I have successfully come up with a design she was happy with. I will be posting in-progress photos, so please check back for updates.

Roshaan