Gallery

Showing posts with label flush trim saw. Show all posts

10 October 2011

Embrace scroll shelf brackets-Part5 final

Hello Everyone!

Well this is it...the final part to this project! The next part will be when I reveal the finished product! So please make sure to return for the reveal.

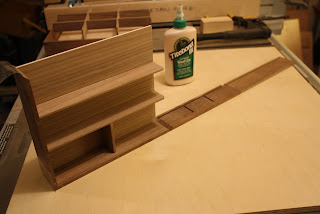
After a trying glue-up of the bracket parts, I cut some slots in the miters for splines. These splines will further strengthen the miters. I cut the slots using a shop made sled which helps me slide the brackets safely over the running saw blade.

Gluing the splines in place. I used some of the left over oak  and sized them to fit the slots exactly. 

Trimming the splines flush using my appropriately named flush-trim saw. I love this saw!

The most exciting part is applying the first coat of finishing oil and seeing the wood just come alive (bracket on right)!  Here I'm applying a few coats of a durable Tung oil finish.


I will give the oil finish a few days to cure and then I will send it off to my client. 

Please check back in for the reveal!

Thanks for looking!
Roshaan

12 March 2011

Raven inlay Jewelry and Make-up Boxes-Part 11

Hello,

This part is the continuation of the upper tray construction. I will be focusing on the glue up of the trays and the reinforcement of the mitered joints with splines. So please join me!


Before I cut the half-lap joints in part 10, I first cut tiny tenons on the ends of the dividers. I then put each divider in place to determine the location of each half-lap joint. The tenons are easily done on the table saw with the miter gauge and stop block.


Before I do any glue up, I do a dry run first to prevent any headaches while I'm in the process of gluing the piece. Now is a good time to work out any kinks in your gluing operation. With this glue-up I determined that I first need to put the divider assemblies in one corner of the tray and then put the bottom panel in place at the same time. Then it's simply a matter of wrapping the other corner parts around the dividers and bottom panel. Of course before I did any of this I made sure to place some clear packing tape on all the mitered joints.


I use a band clamp to snugly bring everything together. This is a great clamp for a mitered box construction.


Here I am using my nifty (do people still say that?) table saw spline sled to cut the slots for the hardwood splines.


I glue the walnut splines in place, but before I do that I check the fit of each one. After the glue dries, I use a flush trim saw to cut off the waste. I then sand everything flush.


We are almost to the finish line! So please come back for the last few parts.

Thanks for looking!

Roshaan


06 October 2010

Heather's Netbook Cherry wood box-Part 3

Hi Everyone!


In this part I will be focusing on strengthening the mitered corners of the box. I favour using contrasting splines on the corners, not only for strength but for aesthetics as well. I will also illustrate the method I use for separating the lid from the bottom of the box.


To safely cut the spline slots on the box corners I used a shop made carrier that cradles the box securely while it slides agaist the table saw fence and over the saw blade. I simply used the thickness of the saw blade or kerf of the blade, which is usually about an 1/8" thickness.


Since the spline slot is an 1/8" thick, I also made my contrasting maple splines the same thickness. There are variables in play when you are dealing with multiple cuts such as these. Sometimes the vibration of the blade or maybe the movement of the box in the carrier could make the slot wider or smaller. Therefore I always individually fit each spline to each slot and I glue the splines into the slots one at a time.


After the glue dried, I used a flush trim saw to trim the splines, just proud of the box surface. I then flushed up the splines with a chisel using a paring cut. I then sanded the box sides with various grits of sandpaper to a smooth finish.

After I cleaned up the sides of the box, I separated the lid from the bottom using the table saw. This is a great method, when the box lid is flush to the box bottom. There is no way the lid will line up to the bottom when you attemp to build each assembly separately. Since the lid and bottom of the box was the same height, I simply found the center of the sides and split the line in half on the saw blade. To prevent the parts from binding as it comes apart, I did not cut the sides all the way through. I left a little bit of a lip to help keep the box together.


After all the sides were cut in half, I carefully split the box using a hand saw. I took extra care on this step, since I did not want to cut and ruin the edges.
Wow, this project is going by fast! Please stay tuned for part 4!
Thanks for looking!
Roshaan


30 August 2010

Cherry Blossom Sideboard Part 4


Hi Everyone!
It's been quite a busy week in the workshop. I've made some great progress with the sideboard, as you can see in the photo above. The sideboard is finally taking shape! I have cut dadoes in the top webframe and the bottom piece on center to receive the center gable. I have also cut dadoes in the center gable itself to receive the two shelves.
Since this piece will be stained with a combination of a nice rich walnut dye and a dark ebony stain, I had to consider the natural wear pattern of opening and closing the sliding doors and how it will effect the stained surface. Since the piece is made out of maple which is a lighter color wood, the wear will show stark contrasts between the dark stain and the maple. To solve this issue, I opted to use a darker wood such as a rich walnut for the tracks. This way if the stain is ever effected by the sliding doors, the contrast won't be so visible.
To attach the sliding door tracks to the upper webframe and the bottom piece I used biscuits and glue to make for a strong and solid joint. Biscuits are football shaped wafers (not the eating kind) which are made out of compressed beech wood and when it is glued into a corresponding slot, it swells up to make for a very strong edge to edge joint. To cut these matching slots, I used a power tool appropriately called a biscuit joiner or sometimes refered to as a plate joiner, as seen in the third photo.
After the tracks were glued I had to notch the ends of the tracks to fit around the stopped rabbets and dadoes which was cut into the side assemblies. Since the panels were too large to safely cut the notches on the table saw, I simply cut them by hand. For accuracy I made a very simple
right angle jig which I then positioned on a layout line and clamped to the panel. I then used a flush trim saw to cut out the notches. A simple yet very effective method for cutting notches by hand.
In part 5 I will be cutting the grooves into the tracks for the sliding doors. I will also make a template for the curved bottom rail and use this template and a router to shape the curve.
Thanks for joining me for part 4, stay tuned for part 5!
Roshaan