Gallery

Showing posts with label jig. Show all posts

05 October 2011

Embrace scroll shelf brackets-Part4

Hi Everyone!

Well we're almost there! Today I have been busy attaching the hanging hardware and routing a small cove profile on the edges of the mitered parts.


Using a mortising jig to rout out the exact shape of the blind  keyhole hanger I'll be using to hang the brackets . I have to place two hangers for added strength and therefore the two will have to line up precisely . I added a couple of stops to the jig to ensure perfect alignment of the two hangers.

The freshly cut recesses for the hangers. Now all I have to do is drill some clearance holes for the heads of the screws.

At the drill press equipped with a 3/8" diameter drill bit, drilling the clearance holes for the head of the screws . 

Routing a small cove profile to the edges of the mitered parts. This will complement the scrolls quite nicely and it also breaks up the hard square edges of the mitered parts. Here I have butted two boards together to create a more stable base for the palm router.  

A close-up of the cove profile. 

Thanks for looking!

Roshaan

07 July 2011

Custom Orchid Picture Frames - Part 2

Hi Everyone,

Welcome back for part 2 of my newest project!

I attach the top cut-out to the bottom part of the frame using double stick tape.  I use some simple right angle alignment jigs to perfectly align the parts. 

I rout a recess on the back of the frame assembly where the interior orchid  is situated. I  do this so that the orchid will sit directly on the glass. I then fill in the recess with shop scraps to make it level with the back.

I then use the scroll saw to carefully cut out the orchid and the window of the frame. 

Using an mdf template made to fit the frame precisely, I rout the recess or rabbet on the back of the frame which will house the glass, matted picture and back panel. 

Thanks for looking!

Roshaan

03 November 2010

Alberta Rose Recipe Box - Part 2

Hi All,

The joinery has begun on the recipe box! After I cut the parts to length, I made a simple finger joint jig, which easily attaches to the table saw miter gauge.
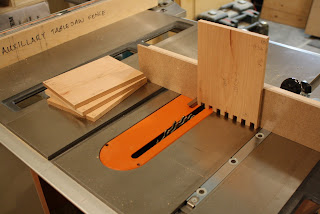


The jig is made up of a hardwood pin which sits into a notch of the same thickness made in the miter gauge auxillary fence. Although the jig is simple to make, it is very critical to get all the elements to allign. To get successful results it is important that the pin, the space in between the blade and the pin and finally the dado stack is the exact same width. Any variation to any element will result in the joints being too loose or too tight.

Another critical part is to make sure to clearly and carefully mark which way is up, sideways bottom, top...well... if it is something that will help you with the orientation of the piece mark it! It is very easy to get all the parts confused and cut a notch where a pin should be. Believe me this leads to some choice words with yourself about yourself!
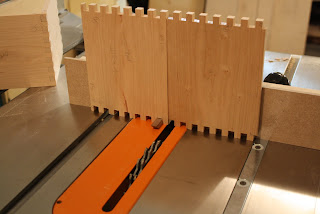

I first start by cutting a pin on the edge of one part by butting the board up against the hardwood pin of the jig as seen in the second photo from the top. After this board is completed, I then start on the corresponding corner of the next board with a notch. I simply use the first board to create the space in between the hardwood pin and the dado stack and then butt the second board up against it. And so on.
After all the finger joints were cut, I then proceeded to cut the grooves at the top and bottom edges of each piece. I had to keep in mind the placement of each pin and notch.
If there was a notch I could simply run the piece right over the blade to create the groove, because the groove will be hidden by the pin. However if there was a pin, I had to cut a stopped groove, because unfortunately this groove can't be hidden. You will be able to see in on the outside face of the box. See detail photo above.
Well, that's it for this part. Come by next time for part 3!
Thanks for looking!
Roshaan


02 November 2010

Alberta Rose Recipe Box - Part 1

Hi Everyone!

The next project I will be working on is a sweet recipe box which will hold standard 4" x 6" cards. It all started with a request to upgrade a current recipe box and to personalize it with a monogram J surrounded by an Alberta rose. The Alberta rose is a wild rose and it is the official foral emblem of the Province of Alberta in Canada, where my client resides.


I presented a couple of sketches to my client and she chose the one pictured above. I think it will add a great focal point to the front of the box. The box will be made out of cherry wood, which will age beautifully. The box corners will be joined with finger/box joints and I will show you how that is done using the miter gauge and a simple jig on the table saw. The box will be topped with a solid brass flip handle and a fancy brass latch on the front of the box will secure everything inside.


With every project I "sticker" the project lumber and allow it to acclimatize to the workshop for at least 3 days. Sticker is just a fancy word for the sticks in between each layer of wood. This just allows air to reach both the top and bottom of the boards.

In the next part I will cut the parts to length and start with the joinery, so please stop by for part 2.

Thanks for looking!

Roshaan

30 August 2010

Cherry Blossom Sideboard Part 4


Hi Everyone!
It's been quite a busy week in the workshop. I've made some great progress with the sideboard, as you can see in the photo above. The sideboard is finally taking shape! I have cut dadoes in the top webframe and the bottom piece on center to receive the center gable. I have also cut dadoes in the center gable itself to receive the two shelves.
Since this piece will be stained with a combination of a nice rich walnut dye and a dark ebony stain, I had to consider the natural wear pattern of opening and closing the sliding doors and how it will effect the stained surface. Since the piece is made out of maple which is a lighter color wood, the wear will show stark contrasts between the dark stain and the maple. To solve this issue, I opted to use a darker wood such as a rich walnut for the tracks. This way if the stain is ever effected by the sliding doors, the contrast won't be so visible.
To attach the sliding door tracks to the upper webframe and the bottom piece I used biscuits and glue to make for a strong and solid joint. Biscuits are football shaped wafers (not the eating kind) which are made out of compressed beech wood and when it is glued into a corresponding slot, it swells up to make for a very strong edge to edge joint. To cut these matching slots, I used a power tool appropriately called a biscuit joiner or sometimes refered to as a plate joiner, as seen in the third photo.
After the tracks were glued I had to notch the ends of the tracks to fit around the stopped rabbets and dadoes which was cut into the side assemblies. Since the panels were too large to safely cut the notches on the table saw, I simply cut them by hand. For accuracy I made a very simple
right angle jig which I then positioned on a layout line and clamped to the panel. I then used a flush trim saw to cut out the notches. A simple yet very effective method for cutting notches by hand.
In part 5 I will be cutting the grooves into the tracks for the sliding doors. I will also make a template for the curved bottom rail and use this template and a router to shape the curve.
Thanks for joining me for part 4, stay tuned for part 5!
Roshaan