Gallery

Showing posts with label joints. Show all posts

12 March 2011

Raven inlay Jewelry and Make-up Boxes-Part 8

Hello Everyone!

The boxes are really taking shape now. I will continue with the glue-up and separate the lid from the bottom in this part.

As soon as each corner is glued and any waste cleaned up, I can insert the top inlaid panel and the bottom panel in the grooves.

Now all I have to do is spread some glue on the remaining corner joints and bring the two halves together. Notice how I have the glue blocks already taped in place so I'm not scrambling around later to find some. Organization is truly important in any glue-up


The box snugly in clamps and just waiting for a cure :)

After the glue has dried and the sides cleaned up, I cut the lid apart from the body of the box. I make sure not to cut all the way through to prevent the parts from binding and causing a safety hazard. I just leave a sliver of wood between the lid and the body and use a hand saw to complete the separation.


At the bench using a sanding base to flatten the top edges of the box and lid.
Well that's all for now folks! Please stay tuned for part 9!
Thanks for looking!
Roshaan


Raven inlay Jewelry and Make-up Boxes-Part 7

Hi All,

Well, I am quite pleased with how my first attempt at marquetry turned out. I think I will be doing quite a few more in the future :)


After I successfully completed the raven inlay, I cut a substrate made out of a good quality Baltic birch plywood. I like to use this material for a substrate, because it is very flat, without prominent grain (which could potentially telescope through the thin veneer) and very stable. I elevate the whole assembly by using shop-made t-stands underneath. These come in very handy for panel glue-ups or any glue-up for that matter. The elevation just allows for easier clamping.


After the veneered panel has cured, I use a sharp utility knife to trim the excess flush.


Now it is just a matter of cutting the panel to size using my shop-made crosscut sled on my table saw. This sled gives you very accurate results.


I'm sure everyone has seen me use this method of gluing difficult joinery. It is because there are many gluing surfaces to these dovetails and since the wood glue dries very quickly, it makes for a tricky glue-up when 4 corners are involved. Therefore, I prefer to glue the box in stages.

After each corner has cured, I use a block plane to trim the waste flush.
Please join me next time to see how the boxes come together!
We're almost there!
Thanks for looking!
Roshaan


19 January 2011

Double Twelve Domino Set - The Reveal

Hi Everyone!

Well here you have it! The completed double twelve domino set! I had a great time building this one-of-a-kind project.

I used nicely figured Eastern Maple for the box. Notice how I carried the figure to the front of the box? This also complements the walnut I used for the divider and the domino backs quite well.


I added a divider to the box, thus creating a pencil "niche". I think it is a great way to keep the pencil at hand for keeping score!

Since the dominoes will get a lot of wear and tear, I decided to finish them with a harder finish such as a spray polyurethane. To the box however, I simply applied about 5 coats of Danish oil finish to bring out the beautiful grain and depth of the maple.
Thank you for looking!
Roshaan


18 January 2011

Double Twelve Domino Set - Part 3

Hi Everyone!


Here are a few more in-progress pictures before I reveal the finished domino set.


Fastforward to the glue-up of the box. Since I used finger joints for the box I have employed the same method of glue-up as seen in the Alberta Rose recipe box project.


A detail shot of the finger joints.


The glue-up of the lid. I have used a bridle joint which is a very strong joint since the joint offers many glue surfaces.


A detail shot of the bridle joint.


Please make sure to come back next time for the reveal of the domino set!


Thanks for looking!


Roshaan


03 November 2010

Alberta Rose Recipe Box - Part 2

Hi All,

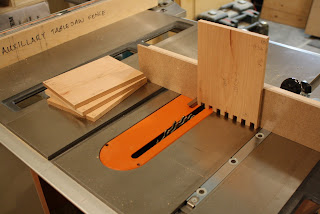
The joinery has begun on the recipe box! After I cut the parts to length, I made a simple finger joint jig, which easily attaches to the table saw miter gauge.


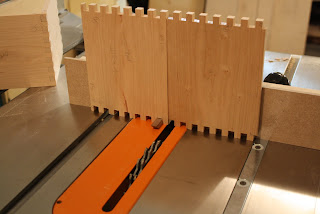
The jig is made up of a hardwood pin which sits into a notch of the same thickness made in the miter gauge auxillary fence. Although the jig is simple to make, it is very critical to get all the elements to allign. To get successful results it is important that the pin, the space in between the blade and the pin and finally the dado stack is the exact same width. Any variation to any element will result in the joints being too loose or too tight.

Another critical part is to make sure to clearly and carefully mark which way is up, sideways bottom, top...well... if it is something that will help you with the orientation of the piece mark it! It is very easy to get all the parts confused and cut a notch where a pin should be. Believe me this leads to some choice words with yourself about yourself!


I first start by cutting a pin on the edge of one part by butting the board up against the hardwood pin of the jig as seen in the second photo from the top. After this board is completed, I then start on the corresponding corner of the next board with a notch. I simply use the first board to create the space in between the hardwood pin and the dado stack and then butt the second board up against it. And so on.
After all the finger joints were cut, I then proceeded to cut the grooves at the top and bottom edges of each piece. I had to keep in mind the placement of each pin and notch.
If there was a notch I could simply run the piece right over the blade to create the groove, because the groove will be hidden by the pin. However if there was a pin, I had to cut a stopped groove, because unfortunately this groove can't be hidden. You will be able to see in on the outside face of the box. See detail photo above.
Well, that's it for this part. Come by next time for part 3!
Thanks for looking!
Roshaan