Gallery

Showing posts with label groove. Show all posts

07 July 2011

Custom Orchid Picture Frames - Part 2

Hi Everyone,

Welcome back for part 2 of my newest project!

I attach the top cut-out to the bottom part of the frame using double stick tape.  I use some simple right angle alignment jigs to perfectly align the parts. 

I rout a recess on the back of the frame assembly where the interior orchid  is situated. I  do this so that the orchid will sit directly on the glass. I then fill in the recess with shop scraps to make it level with the back.

I then use the scroll saw to carefully cut out the orchid and the window of the frame. 

Using an mdf template made to fit the frame precisely, I rout the recess or rabbet on the back of the frame which will house the glass, matted picture and back panel. 

Thanks for looking!

Roshaan

12 March 2011

Raven inlay Jewelry and Make-up Boxes-Part 10

Hello,

It's all about making the top trays in the next two parts. I will be cutting stopped grooves on my little Dremel router table and half-lap joints on the table saw. So, here we go!


I love my Dremel tool! It is so versatile and can do pretty much everything bigger machinery can do, but on a much smaller scale. It is perfect for model makers, home owners and for woodworkers like me. Here I have attached my Dremel tool to a router table attachment to cut the 1/8" wide stopped grooves, which will join the cross members of the tray dividers.


Here are all the tray sides layed out to better visualize how the tray and dividers will come together. This tray is meant for the jewelry box and it will have 9 equal sections for rings and things.


Here I am cutting the half lap joints on all the dividers. It is best done on the table saw with a single saw blade instead of a stacked dado set. This method will yield greater accuracy when fitting parts together.


A half-lap is basically two notches going halfway through the corresponding parts and in opposite directions.


I glue up the dividers first before I glue them to the stopped grooves in the tray sides. Now is the perfect opportunity to clean up any glue squeeze-out.
That's it for now! Please come back soon for the continuation of the tray construction.
Thanks for looking!
Roshaan


Raven inlay Jewelry and Make-up Boxes-Part 9

Hi Everyone,


It's hardware time! This is a true sign that we are getting very close to the finish line. In this part I will be installing the hinges, the chains etc. and I will also start construction of the upper trays.


I usually cut the shallow mortises for the hinges using a hand held router and then square the lines with a sharp chisel. This time I'm trying something new. I'm using a router table with stop blocks on either side of the router bit, to control the length of the cut, which precisely fits the hinge leaves.


Notice that the router bit leaves a round corner? I simply use a chisel to square the corners to fit the hinge better.


I also went ahead and installed the chain to keep the lid from flopping backward. Since the box will have an upper tray, I also attached some wooden risers on the interior of the box. Notice the rabbet cut on the riser on the chain side of the box? This rabbet will act as a stop, which will prevent the tray from sliding side to side and hitting the chain.


The trays will have simple mitered corners with splines for reinforcement. At the table saw with the blade tilted at 45 degrees to cut the miters.


A closeup of the grooves I cut to house the bottom panel of the tray.

Please join me next time for part 10 when I will be constructing the dividers of the trays.

Thanks for looking!

Roshaan


11 November 2010

Alberta Rose Recipe Box - Part 3

Hi Everyone,

I am making great progress on the recipe box. In this part I will share how to rabbet the top and the bottom parts. Also how to create a routing template to rout out a recess on the inside face of the front part of the box. And finally how to transfer the rose pattern onto the front.


Since we have cut grooves on the inside faces of all sides in part 2, we will be cutting rabbets onto the top and bottom parts to slip into those grooves. The rabbets are simply cut on the table saw using a dado stack and an auxillary wooden fence. I use a wooden fence so that I can bury the dado blade under the fence to get a clean and accurate rabbet.
Since I wanted the rose cut-out to pop, I had to figure out how to introduce a contrasting backer piece to the front. I could have simply applied a full piece of contrasting wood to the inside, but then you will be able to see the contrast on the top edge of the box when it is opened. I wanted a clean and crisp look to all the edges of the box. The best solution was to rout a recess on the inside face of the front where the rose design will be cut. This is easily done by using a routing template, a router, a straight bit and a template guide and bushing set. First I made a simple template out of 1/4" thick mdf. The method pictured above is the most accurate way to create a perfectly square recess.

I then used double stick tape to attach the template to the front piece of the box. I made sure to attach the template to the inside face of the front. I proceeded to rout the recess moving the router in a clockwise direction. I also made sure to make a couple shallow passes, instead on one deep one, which will cause the router and the bit to work extra hard and be a more dangerous operation.

After I made sure that all the routed edges of the recess was nice and smooth without any bumps, I carefully removed the template. I squared up the rounded corners of the recess with a chisel.


I then transfered the edges of the recess with a pencil and square to the outside face of the front. This gave me a reference point for careful placement of the rose pattern. I then used carbon paper to transfer the pattern onto the front. I also had to keep in mind the placement of the latch when I transfered the pattern.
Well that's it for part 3! Please join me next time for part 4!
Thanks for looking!
Roshaan


03 November 2010

Alberta Rose Recipe Box - Part 2

Hi All,

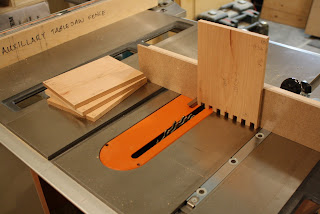
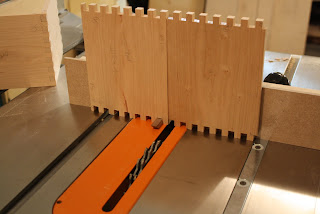
The joinery has begun on the recipe box! After I cut the parts to length, I made a simple finger joint jig, which easily attaches to the table saw miter gauge.


The jig is made up of a hardwood pin which sits into a notch of the same thickness made in the miter gauge auxillary fence. Although the jig is simple to make, it is very critical to get all the elements to allign. To get successful results it is important that the pin, the space in between the blade and the pin and finally the dado stack is the exact same width. Any variation to any element will result in the joints being too loose or too tight.

Another critical part is to make sure to clearly and carefully mark which way is up, sideways bottom, top...well... if it is something that will help you with the orientation of the piece mark it! It is very easy to get all the parts confused and cut a notch where a pin should be. Believe me this leads to some choice words with yourself about yourself!


I first start by cutting a pin on the edge of one part by butting the board up against the hardwood pin of the jig as seen in the second photo from the top. After this board is completed, I then start on the corresponding corner of the next board with a notch. I simply use the first board to create the space in between the hardwood pin and the dado stack and then butt the second board up against it. And so on.
After all the finger joints were cut, I then proceeded to cut the grooves at the top and bottom edges of each piece. I had to keep in mind the placement of each pin and notch.
If there was a notch I could simply run the piece right over the blade to create the groove, because the groove will be hidden by the pin. However if there was a pin, I had to cut a stopped groove, because unfortunately this groove can't be hidden. You will be able to see in on the outside face of the box. See detail photo above.
Well, that's it for this part. Come by next time for part 3!
Thanks for looking!
Roshaan


02 October 2010

Heather's Netbook Cherry wood box-Part 2


Hi All,

In this part of the project I will focus on the assembly of the box. I will discuss cutting the grooves into the box sides and the method I use to glue up the box. So please join me for part 2!


After the miters were cut on all side pieces of the box, I returned the blade to a 90 degree angle. I then set up the blade to the exact width and depth of the grooves to be cut into the top and bottom edges of the sides. These grooves will house the top and bottom panels of the box. I always make sure to make test cuts into an extra piece first, to fine tune the fit of the panels into the grooves. After I found the perfect fit, I then went ahead and cut the grooves into the finished pieces.

Before any glue-up I dry fit all the pieces to see if everything is fitting as it should. The easiest and most effective method I use for assembling miters is the clear packing tape method. First I lay all the sides with the miters facing down on a flat surface. I then butt all the corresponding miters end to end. With the pieces of packing tape already cut to length I then place a piece of tape firmly over each joint also making sure the top edges are lined up. Then I flip the assembly so that the miters are now facing up. I spread glue onto all the miters, but before I closed the joints, I inserted the panels.


I then proceed to wrap each miter onto the next to close all the miters around the panels as seen in the above photo. You might ask yourself, but what about accessing the inside of the box? Well, I have a great trick to seperate the top from the bottom at a later stage.


For extra clamping pressure, I use a band clamp. I then set the assembly aside to cure for about 30 minutes.
In the next part, I will concerntrate on the corners of the box, so stay tuned for part 3!
Thanks for joining me!
Roshaan


10 September 2010

Cherry Blossom Sideboard Part 6

Hi Everyone!

Welcome to part 6 of the Cherry Blossom Sideboard! For this part of the project I concerntrated on building the two sliding frame and panel doors. I also cut a slight bevel on the top.


Since the doors are a fairly large size I had to make sure the joinery will be strong enough to withstand the sliding motion of the doors. First I started with beefy frame members which housed a large panel. In a later part I will overlay the cherry blossom scroll sawn panels onto the finished frame and panel doors.
I then decided on a bridle joint for the doors. This joint is essentially an exposed or open ended mortise and tenon joint. To cut this joint on the table saw, I used a shop made jig equipped with a toggle clamp to safely and securely hold the piece in place, while it is slid over the saw blade. I first started with the mortise or in this case the deep slot, as pictured above.
I then used the same jig to cut the tenon, making sure to measure the slot carefully for a snug fit. This jig is an invaluable and very useful addition to any woodworking shop.

After I cut the bridle joint I proceeded to carefully measure the exact thickness of the panel and transfered this measurement onto the frame members. Using the table saw I cut the grooves on the inside edges of the frame members to receive the center panel. The above photo shows a nice detail shot of one corner of the door assembly including the center panel.


After I was happy with how the door came together during the dry fit, I finally glued and clamped the door.


I also cut a slight bevel on the top to add a nice detail to an otherwise flat rectangular slab of wood. Before I cut the bevel I had to cover the exposed edges of the plywood with 3/4" thick hard maple. I mitered the front corners of the edging for a seamless wrap. The back corners of the edging are simply butted together, since the back edge of the top was not beveled.
In the next part I will assemble and glue the carcass of the sideboard. I will also cut some handy [get it :)] finger pulls in the doors and finally taper the legs.
Phew! We are ALMOST there!
Thanks for looking!
Roshaan


07 September 2010

Cherry Blossom Sideboard Part 5


Hi Everyone!
The sideboard is really taking shape!
I have cut the grooves into the front edges of the top webframe and the bottom and these grooves will act as the sliding tracks for
the frame and panel doors.
After I dry assembled the cabinet, I measured the length for the
bottom front curved stretcher as well as the back stretcher. The
function of the stretcher is to basically support and evenly
distribute the weight of the cabinet.
To shape the curve on the front stretcher I made a template out
of 1/4" thick mdf (medium density fiberboard) first. Using a
template is a great way to get a uniform look to any piece. It is
especially handy when you have to make multiple pieces with the
same shape. One thing to keep in mind is that you have to make
sure your template is perfectly smooth, because any bumps and
dips found on your template will ultimately be transfered onto your good piece. One way to get is smooth edge is to use a drum sander with various diameters to sand the piece smooth as seen in the first photo.
I then took the template and used double sided tape to adhere it to
the 3/4" thick maple stretcher piece. Then with my palm router
which was equipped with a flush trim router bit, I routed the exact
profile of the curve onto the stretcher.
Next I layed out the location of the notches for the ribs that will bridge the front curved stretcher with the straight back stretcher. To make the notches I routed out the bulk of the material with my palm router and used a chisel and mallet to clean
up the corners and edges of the notches. Notice the fantastic
handmade mallet in the background, which was a gift from a very
talented fellow woodworker and a dear friend. He makes all his furniture by hand with reclaimed and recycled wood...even branches!
To cut the notches in the ribs I simply used a dado stack in my table saw with the aid of a miter gauge. A dado stack is basically a bunch of saw blades stacked together to cut grooves and and dadoes of various thicknesses.
The last photo shows the assembled stretcher assembly dry clamped to the bottom of the cabinet.
We are almost in the final stretch! Next would be to build some doors and cut a slight bevel on the edges of the top to finish off the top nicely.
Come back next time for part 6!
Thanks for looking!
Roshaan


22 August 2010

Cherry Blossom Sideboard Part 3


Hello All,

Since I completed the side assemblies in part 2, I was now ready to cut some stopped dadoes ( grooves going across the grain) to hold the bottom and the middle shelves... and rabbets ( a long notch at the top edge of the side assembly) to hold the sub-top.

For this operation I used a hand held plunge router. Since accuracy is very important I had to come up with a way so that these dadoes and rabbets will line up precisely in both pieces. I simply ganged and clamped both sides together, so that I can set up a fence across the whole assembly to rout out perfectly alligned dadoes and rabbets (as seen in top photo).

With a little fine tuning the shelves and sub-top fit quite nicely. The last photo shows all the completed cuts in both corresponding sides. The next step will be to rout a rabbet along the back edges of the sides and top and bottom to receive the back. I will also cut some dadoes into the top and bottom pieces to receive the center gable or divider. Be sure to tune in next time for part 4!

Thanks for looking!


Roshaan

19 August 2010

Cherry Blossom Sideboard Part 2

Hello Everyone,

Well, I am making some progress on this project. I just completed the side assemblies, which consists of the legs, the top and bottom rails and side panels. I used mortise and tenon joinery to attach the rails (the horizontal top and bottom parts) to the legs and I then went ahead and cut a 1/4" deep groove into the legs and rails to receive the side panels. Since the panels and the rails were both 3/4" thick I had to cut a rabbet (notch) along all the edges of the panels to fit into the 1/4" thick groove. This also adds a nice reveal on the outside of the assembly.


The series of photos shows the steps in the order that it was completed.
The top photo shows all the parts layed out exactly how it will eventually be
assembled and glued together. The second photo shows the detail of the joinery including the rabbet along the edges of the side panel. Below that we have a photo of the glue-up of all the parts. I use t-stands to elevate the assembly, for easy gluing and clamping. And voila!...we finally have the side assembly of the sideboard. I will eventually taper the legs after I have cut all the joinery on the inside face of the side assemblies.

It truly is a great feeling to see the outcome of a whole bunch of parts scattered on your bench! I am sure that most woodworkers will agree when I say that the glue-up is the most stressful part of any woodworking project.

But we all love the rush!
Roshaan