Gallery

Showing posts with label splines. Show all posts

10 October 2011

Embrace scroll shelf brackets-Part5 final

Hello Everyone!

Well this is it...the final part to this project! The next part will be when I reveal the finished product! So please make sure to return for the reveal.

After a trying glue-up of the bracket parts, I cut some slots in the miters for splines. These splines will further strengthen the miters. I cut the slots using a shop made sled which helps me slide the brackets safely over the running saw blade.

Gluing the splines in place. I used some of the left over oak  and sized them to fit the slots exactly. 

Trimming the splines flush using my appropriately named flush-trim saw. I love this saw!

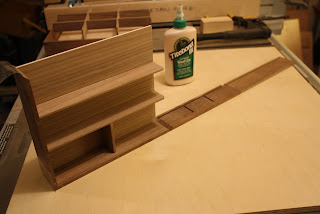
The most exciting part is applying the first coat of finishing oil and seeing the wood just come alive (bracket on right)!  Here I'm applying a few coats of a durable Tung oil finish.


I will give the oil finish a few days to cure and then I will send it off to my client. 

Please check back in for the reveal!

Thanks for looking!
Roshaan

12 March 2011

Raven inlay Jewelry and Make-up Boxes-Part 11

Hello,

This part is the continuation of the upper tray construction. I will be focusing on the glue up of the trays and the reinforcement of the mitered joints with splines. So please join me!


Before I cut the half-lap joints in part 10, I first cut tiny tenons on the ends of the dividers. I then put each divider in place to determine the location of each half-lap joint. The tenons are easily done on the table saw with the miter gauge and stop block.


Before I do any glue up, I do a dry run first to prevent any headaches while I'm in the process of gluing the piece. Now is a good time to work out any kinks in your gluing operation. With this glue-up I determined that I first need to put the divider assemblies in one corner of the tray and then put the bottom panel in place at the same time. Then it's simply a matter of wrapping the other corner parts around the dividers and bottom panel. Of course before I did any of this I made sure to place some clear packing tape on all the mitered joints.


I use a band clamp to snugly bring everything together. This is a great clamp for a mitered box construction.


Here I am using my nifty (do people still say that?) table saw spline sled to cut the slots for the hardwood splines.


I glue the walnut splines in place, but before I do that I check the fit of each one. After the glue dries, I use a flush trim saw to cut off the waste. I then sand everything flush.


We are almost to the finish line! So please come back for the last few parts.

Thanks for looking!

Roshaan


09 December 2010

Double Twelve Domino Set Intro

Hi Everyone,

It's been a while since we last met, nonetheless I have been quite busy in the workshop. Since I had to meet a very special deadline for Christmas I have not had the time to really do a full in- process picture documentation of my most recent custom order.

I did however sneek in a few pictures and I will share them with you in a couple of posts.

What I have been working on is a custom set of hardwood double twelve domino set with a sliding lid box. I have done a set before, but it is differs from each other in many ways. The first one only had 28 tiles to make up a double six set. The second set have over 90 tiles to make up a double twelve set. The tile itself is a bit different in the way that the first set had a cut-out line and a dot in the middle of the line to seperate the top from the bottom of the tile. The second set was a bit simpler with only a v-groove line in the center of the tile.

The above photo depicts the double six set that I made. Please check back to see the reveal of the double twelve set at a later stage!
The boxes are different as well. The first set had a maple mitered box reinforced with walnut keys, while the second set had a maple finger-joint box with a divider on the interior of the box for a few pens or pencils.

The double twelve set was meant as a gift to a very lucky set of parents on Christmas day!

I hope they liked it!

Thanks for looking!


Roshaan


21 October 2010

Heather's Netbook Cherry wood box-Part Final

Hi Everyone!

Well I am finally done with the netbook cherry wood box! The last week I spent oiling the box with a Danish oil finish. I also finished the box off with a rich plush felt liner to cushion the netbook while it is stored and especially during travel.


I applied about 5 coats of the oil finish over about a week's time. Notice the difference between the unfinished cherry to the left and the cherry with one coat of oil applied to the piece on the right. I love using an oil finish to bring out the natural beauty and richness of the wood's color and grain. Although the cherry is still a bit light in color, over time it will age to a nice reddish tone making the contrast of the maple splines pop even more.


The inside of the box received a felt liner to cushion the netbook. The felt was a breeze to apply because it already had a peel and stick backing. All I had to do was cut the felt parts to the exact dimensions of the inside of the box. I first applied the bottom and then proceeded to apply the sides.

After the felt was applied, I re-attached the stop hinge and the latches. I did however had to clear the dried oil from the screw holes with a drill bit.

I am happy with how the box turned out and I hope my client will be as well.

Thanks for joining me!

Roshaan

06 October 2010

Heather's Netbook Cherry wood box-Part 3

Hi Everyone!


In this part I will be focusing on strengthening the mitered corners of the box. I favour using contrasting splines on the corners, not only for strength but for aesthetics as well. I will also illustrate the method I use for separating the lid from the bottom of the box.


To safely cut the spline slots on the box corners I used a shop made carrier that cradles the box securely while it slides agaist the table saw fence and over the saw blade. I simply used the thickness of the saw blade or kerf of the blade, which is usually about an 1/8" thickness.


Since the spline slot is an 1/8" thick, I also made my contrasting maple splines the same thickness. There are variables in play when you are dealing with multiple cuts such as these. Sometimes the vibration of the blade or maybe the movement of the box in the carrier could make the slot wider or smaller. Therefore I always individually fit each spline to each slot and I glue the splines into the slots one at a time.


After the glue dried, I used a flush trim saw to trim the splines, just proud of the box surface. I then flushed up the splines with a chisel using a paring cut. I then sanded the box sides with various grits of sandpaper to a smooth finish.

After I cleaned up the sides of the box, I separated the lid from the bottom using the table saw. This is a great method, when the box lid is flush to the box bottom. There is no way the lid will line up to the bottom when you attemp to build each assembly separately. Since the lid and bottom of the box was the same height, I simply found the center of the sides and split the line in half on the saw blade. To prevent the parts from binding as it comes apart, I did not cut the sides all the way through. I left a little bit of a lip to help keep the box together.


After all the sides were cut in half, I carefully split the box using a hand saw. I took extra care on this step, since I did not want to cut and ruin the edges.
Wow, this project is going by fast! Please stay tuned for part 4!
Thanks for looking!
Roshaan


28 September 2010

Heather's Netbook Cherry Wood Box

Hi Everyone,

Well, the sideboard is done and delivered and now I am on to the next custom order.


With the rapid advance of technology, nowadays you can take your computer with you everywhere...on a boat, a plain, a train, the rest room...well you get the picture. But with that ability comes a concern of how to safely carry it from place to place, without damaging sensitive parts. I have been asked to make a custom cherry wood box with a latch to safely store and carry a newly acquired netbook. It always amazes me how they get a ton of technology into such a tiny space! This netbook measures a whopping 1 1/2" high, by 6 1/2" deep, by 9" long! Wow, what will they think of next...a computer screen that operates with a simple touch :)


The box itself will be constructed using a simple mitered joint, which will then be reinforced with nice contrasting maple splines. It will have two locking latches in the front to keep the netbook securely tucked away in the box. It will also have brass stop hinges, so when the box is opened the lid will stay in place at about a 100 degree angle. To cushion the netbook, I will use a plush rich chocolate brown felt to line the inside of the box.


Boxes are deceptively difficult to construct. Because of it's small size every aspect of the box will be scrutinized and any flaw will be magnetized. So I have to make sure that my joints are nice and tight and that my finish is flawless. This is of course the end result I strive for in all the pieces I make...big or small.


The construction of the box has already begun, so I will be posting in progress pictures very soon. Please come back for part 1 of the netbook box construction.


Thanks for looking!


Roshaan

03 August 2010

One-on-one workshop with Lesley


Hello Everyone,

I had a great opportunity to teach a one-on-one woodworking workshop from my modest yet organized garage shop. This workshop was to be a birthday gift for the sister of a great friend of mine. Btw...what a great birthday gift idea! Please take note for future reference :)

Lesley was an ideal student since she had a great passion for anything handmade and she was willing to learn in a very short amount of time. I have to give her credit for sticking with me to the very end of a fun but exhausting 8 hour day. At the end of the day she went home with a great token of her hard work...a lovely keepsake box made out of hard maple with a cherry wood scroll sawn top.

I gave Lesley a few scroll saw patterns to choose from, and she immediately gravited to the elegant, yet intricate dragonfly design. The design was a bit ambitious for a beginner, but I told her she had to be happy with the design since she was planning to keep the box for a very long time. The box sides was mitered which was then further enhanced with cherry splines. Splines not only add strenth to the joint but also dresses up a simple mitered box. There are no visible hinges, because the lid opens with the aid of 1/8" diameter brass pivot pins which is glued with epoxy into drilled holes in the sides of the box.

At the end of the day Lesley was extremely pleased with what she accomplished in such a short amount of time and so was I. I hope she will enjoy the keepsake box for a very long time and will keep it in the family for many more years to come.


Roshaan