Gallery

Showing posts with label marquetry. Show all posts

22 March 2011

Raven inlay Jewelry and Make-up Boxes-The Reveal

Hello,

Well, here it is! The finished inlay boxes. It was so much fun to construct. I'm hoping to do more marquetry in the near future.


The jewelry box.


The make up box.

Thanks for joining me!
Roshaan

20 March 2011

Raven inlay Jewelry and Make-up Boxes-Part Final

Hello,

Well, this is it! The final installment of the duo of boxes. In this part I will be applying a finish and putting on the final touches.


The finish I'm applying is a tough wearing tung oil. It also gives the walnut a warm finish and makes the grain really come alive.


After the finish has cured for a couple of days, it is now safe to handle without getting finger smudges on the fresh finish. I apply a rich brown felt to the bottom of the jewelry box and the upper tray. The make up box will simply have a nicely finished wooden interior. I also reattach all the brass hardware to finish everything off.

I really enjoyed this project and I hope you did too!

Please stay tuned for the reveal.

Thanks for looking!

12 March 2011

Raven inlay Jewelry and Make-up Boxes-Part 11

Hello,

This part is the continuation of the upper tray construction. I will be focusing on the glue up of the trays and the reinforcement of the mitered joints with splines. So please join me!


Before I cut the half-lap joints in part 10, I first cut tiny tenons on the ends of the dividers. I then put each divider in place to determine the location of each half-lap joint. The tenons are easily done on the table saw with the miter gauge and stop block.
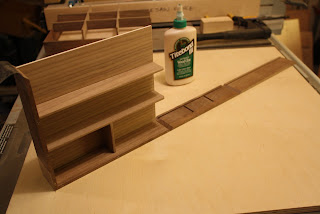


Before I do any glue up, I do a dry run first to prevent any headaches while I'm in the process of gluing the piece. Now is a good time to work out any kinks in your gluing operation. With this glue-up I determined that I first need to put the divider assemblies in one corner of the tray and then put the bottom panel in place at the same time. Then it's simply a matter of wrapping the other corner parts around the dividers and bottom panel. Of course before I did any of this I made sure to place some clear packing tape on all the mitered joints.


I use a band clamp to snugly bring everything together. This is a great clamp for a mitered box construction.


Here I am using my nifty (do people still say that?) table saw spline sled to cut the slots for the hardwood splines.


I glue the walnut splines in place, but before I do that I check the fit of each one. After the glue dries, I use a flush trim saw to cut off the waste. I then sand everything flush.


We are almost to the finish line! So please come back for the last few parts.

Thanks for looking!

Roshaan


Raven inlay Jewelry and Make-up Boxes-Part 7

Hi All,

Well, I am quite pleased with how my first attempt at marquetry turned out. I think I will be doing quite a few more in the future :)


After I successfully completed the raven inlay, I cut a substrate made out of a good quality Baltic birch plywood. I like to use this material for a substrate, because it is very flat, without prominent grain (which could potentially telescope through the thin veneer) and very stable. I elevate the whole assembly by using shop-made t-stands underneath. These come in very handy for panel glue-ups or any glue-up for that matter. The elevation just allows for easier clamping.


After the veneered panel has cured, I use a sharp utility knife to trim the excess flush.


Now it is just a matter of cutting the panel to size using my shop-made crosscut sled on my table saw. This sled gives you very accurate results.


I'm sure everyone has seen me use this method of gluing difficult joinery. It is because there are many gluing surfaces to these dovetails and since the wood glue dries very quickly, it makes for a tricky glue-up when 4 corners are involved. Therefore, I prefer to glue the box in stages.

After each corner has cured, I use a block plane to trim the waste flush.
Please join me next time to see how the boxes come together!
We're almost there!
Thanks for looking!
Roshaan


28 February 2011

Raven inlay Jewelry and Make-up Boxes-Part 6

Hello Everyone!

I think this part is quite exciting since I have not done any inlay or more specifically marquetry before. I have not used one power tool or woodworking machine to do this operation! The only tool that was mechanical was my pencil :) It is strictly done by hand using only a very sharp utility knife, some carbon paper and of course my pencil. Let's begin!


I make sure I have a clean copy of the design...in this case the raven design. I first make sure to make small registration marks to easily align the drawing at each stage. I start by transferring the outline of the raven onto some nicely figured cherry veneer by placing carbon paper under the drawing. I carefully cut out the outline of the raven making sure to keep the knife perpendicular to the surface of the veneer sheet. I then take some nice contrasting walnut veneer and place it behind the cutout shape. After I am happy with the placement, I tape the walnut veneer in place with a couple strips of masking tape. I carefully trace the outline by making a light scoring cut with my knife making sure not to go all the way through in one pass. I then remove the walnut veneer to complete the cut.


After I am happy with the fit of the shape I then use white glue to glue the shape in place. I use a few strips of masking tape on the back of the piece to keep everything in place. I reposition the drawing by using my registration marks to transfer details of the body into place.

Now it is just a matter of cutting out a window by following the lines and replacing the cutout with a contrasting piece using the method used earlier.


After the body is complete, I again use the registration marks to position the drawing to transfer the reeds into place. I chose a contrasting maple veneer to add some depth and interest to the piece. One trick I learned was to reinforce the back of the veneer with masking or veneer tape whenever you are dealing with fragile parts, such as the points of the tops of the reeds.


It's really starting to take shape! Just a few more reeds to go!
I think my first attempt at marquetry was a great success. I had so much fun with it, I think I might sneak in an inlay or two in all my projects from now on ;)
Please stop by next time for part 7!
Thanks for looking!
Roshaan