In this part I will continue to cut out the dovetails. At the end of this part we will have great fitting dovetails that are not only great to look at, but also very strong.

I ended part 2 with cutting the pins with a dovetail saw, making sure to stay well away from the scribed layout lines. Now I continue to cut out the waste in between the pins by using a coping saw. I opt for a coping saw instead of my scroll saw because now I am dealing with angled sides.

After the waste has been removed I reach for my chisels to pare away the rest while using the scribed knife lines as guides. I also square the shoulders by using the same method as seen in part 2.

And voila! The finished dovetails on both boxes! These are perfect fitting dovetails. Although the paring method is time consuming it surely leaves you with exceptional results!
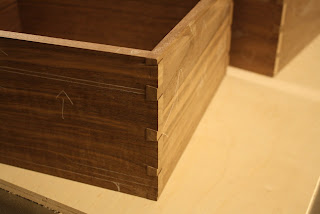
A close-up of the dovetails. Also notice how the grain of the walnut continues consistantly around all sides of the box.
In the next part I will be tackling some grooves and shaping the bottom of the box sides for a nice design detail.
Thanks for looking!
Roshaan


 After all the tails are cut at the table saw I then look toward my scroll saw to remove the waste in between the tails. I make sure I stay far enough away from the the scribed line of the shoulders. This will be cleaned up later with the help of a guide block and chisel. Who says a scroll saw can't be used for fine joinery!
 At my bench I clean up the shoulders of the tails. I use the aid of a beefy guide block to help guide the chisel at a perfect 90 degree angle as I chop out the waste.
 After all the shoulders of the tails have been squared up, it was time to mark the pin board. I carefully line up the tail board on the end of the pin board. I steadily hold the pieces in place and with a very sharp marking knife, I carefully trace the angle of the tails onto the pin board.

