Gallery

28 February 2011

Raven inlay Jewelry and Make-up Boxes-Part 6

Hello Everyone!

I think this part is quite exciting since I have not done any inlay or more specifically marquetry before. I have not used one power tool or woodworking machine to do this operation! The only tool that was mechanical was my pencil :) It is strictly done by hand using only a very sharp utility knife, some carbon paper and of course my pencil. Let's begin!


I make sure I have a clean copy of the design...in this case the raven design. I first make sure to make small registration marks to easily align the drawing at each stage. I start by transferring the outline of the raven onto some nicely figured cherry veneer by placing carbon paper under the drawing. I carefully cut out the outline of the raven making sure to keep the knife perpendicular to the surface of the veneer sheet. I then take some nice contrasting walnut veneer and place it behind the cutout shape. After I am happy with the placement, I tape the walnut veneer in place with a couple strips of masking tape. I carefully trace the outline by making a light scoring cut with my knife making sure not to go all the way through in one pass. I then remove the walnut veneer to complete the cut.


After I am happy with the fit of the shape I then use white glue to glue the shape in place. I use a few strips of masking tape on the back of the piece to keep everything in place. I reposition the drawing by using my registration marks to transfer details of the body into place.

Now it is just a matter of cutting out a window by following the lines and replacing the cutout with a contrasting piece using the method used earlier.


After the body is complete, I again use the registration marks to position the drawing to transfer the reeds into place. I chose a contrasting maple veneer to add some depth and interest to the piece. One trick I learned was to reinforce the back of the veneer with masking or veneer tape whenever you are dealing with fragile parts, such as the points of the tops of the reeds.


It's really starting to take shape! Just a few more reeds to go!
I think my first attempt at marquetry was a great success. I had so much fun with it, I think I might sneak in an inlay or two in all my projects from now on ;)
Please stop by next time for part 7!
Thanks for looking!
Roshaan


23 February 2011

Raven inlay Jewelry and Make-up Boxes-Part 5

Hi Everyone!


Well, the duo of boxes are really starting to take shape. Speaking of which, in this part I will shape the bottom of the boxes to add a touch of flair to the plain sides.


I start by laying out some lines and curves, first using my nifty ruler stop to mark a consistant line from the bottom edges. I then use a combination square to mark a layout line from the ends of the boards.


With an appropriate sized washer I draw on the shape of the curve. I could have made up a template, but since I only have a few pieces to work with, it was not feasible for me to spend the time. If for instance I had quite a bit to do a template would have been the better way to go.


To save time, I stack two sides together with some double sided tape, making sure that everything lines up. A great allignment tool is a simple shopmade right angle jig to make sure that everything lines up.


A scroll saw is a great tool to cut away the waste. I do make sure that I stay about 1/32" away from the layout lines. I will flush everything up later with a router.


I install a 3/8" diameter straight router bit in my router table to flush up and remove the rest of the waste. I allign the fence an appropriate distance away from the router bit to get the desired curve.
Thank you for joining me for part 5! Please make sure to stay tuned for part 6.
Thanks for looking!
Roshaan


22 February 2011

Raven inlay Jewelry and Make-up Boxes-Part 4

Hello,

Welcome back for part 4 of the duo of boxes! In this part I will be veneering the bottom piece of the make-up box and I will also cut some stopped grooves and through grooves on all box sides using only a single blade in the table saw.


Before I cut the grooves to house the bottom panel of the box, I first veneer the bottom panel to determine the width of the groove to ensure a nice snug fit. Here I use a fairly straight grained walnut veneer sheet to be glued to a baltic birch substrate. I use baltic birch because it is a high grade plywood product that is flat and stable. I wouldn't for instance use a highly figured piece of fir ply since the grain will telescope through the thin veneer sheet.
To ensure a full veneer to substrate contact I employ quite a few clamps, some thick cauls as well as beefy glue bases. I do prefer to use white glue because it has a thin glue line and it also offers a longer working time.


After the bottom piece is removed from the clamps, I simply use a sharp utility knife to cut away the excess veneer along all sides. I then measure the thickness of the piece to determine the width of the grooves to be cut on the table saw.
I make sure to cut stopped grooves on the tail boards and through grooves on the pin boards. Stopped grooves are essential to prevent unsightly holes on the outside of the box.


One negative aspect of stopped grooves is that you have to square the ends to ensure a perfect fit of the bottom panels. This is easily done with a few sharp chisels and wooden mallet.
Well that is it for part 4! Please join me next time when I will show you how to shape the bottom of the box sides to add some flair!
Thanks for looking!
Roshaan


21 February 2011

Raven inlay Jewelry and Make-up Boxes-Part 3

Hi Everyone!

In this part I will continue to cut out the dovetails. At the end of this part we will have great fitting dovetails that are not only great to look at, but also very strong.


I ended part 2 with cutting the pins with a dovetail saw, making sure to stay well away from the scribed layout lines. Now I continue to cut out the waste in between the pins by using a coping saw. I opt for a coping saw instead of my scroll saw because now I am dealing with angled sides.
After the waste has been removed I reach for my chisels to pare away the rest while using the scribed knife lines as guides. I also square the shoulders by using the same method as seen in part 2.

And voila! The finished dovetails on both boxes! These are perfect fitting dovetails. Although the paring method is time consuming it surely leaves you with exceptional results!

A close-up of the dovetails. Also notice how the grain of the walnut continues consistantly around all sides of the box.
In the next part I will be tackling some grooves and shaping the bottom of the box sides for a nice design detail.
Thanks for looking!
Roshaan

13 February 2011

Raven inlay Jewelry and Make-up Boxes-Part 2

Hi Everyone!

Welcome back to part two of the box duo! We ended the last part by carefully marking out the dovetails. Today we will be cutting those dovetails by a combination of the table saw and by hand using a hand saw especially made for cutting dovetails, appropriately named a dovetail saw. To clean up the dovetails we will be using various sized chisels and a wooden mallet.


I start by cutting the tails first. I use the table saw to quickly and accurately cut the angles of the tails. I simply tilt the blade to the appropriate angle of the dovetails, in this case I went with the 1 : 6 ratio to get that angle. The stop block is a great way to get accurate and repeatable cuts. Now from these cuts everything else will follow, so I take extra care to be very precise with this operation.

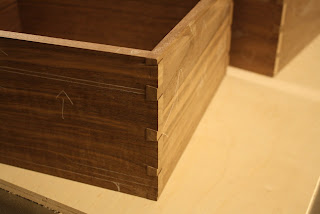
After all the tails are cut at the table saw I then look toward my scroll saw to remove the waste in between the tails. I make sure I stay far enough away from the the scribed line of the shoulders. This will be cleaned up later with the help of a guide block and chisel. Who says a scroll saw can't be used for fine joinery!
At my bench I clean up the shoulders of the tails. I use the aid of a beefy guide block to help guide the chisel at a perfect 90 degree angle as I chop out the waste.

After all the shoulders of the tails have been squared up, it was time to mark the pin board. I carefully line up the tail board on the end of the pin board. I steadily hold the pieces in place and with a very sharp marking knife, I carefully trace the angle of the tails onto the pin board.


Before I can cut the pins however, I make sure to scribe the thickness of the tail board onto the edge of the pin board by using a marking gauge. I also use a machinist square to carry the lines of the angles onto the face of the pin board. Then with my fantastic Veritas dovetail saw I cut the pins, staying well away from the marked lines.
Well that's it for now folks! Please join me next time to see how the dovetails turn out.
Thanks for looking!
Roshaan


06 February 2011

Raven inlay Jewelry and Make-up Boxes

Hello Everyone,


Please join me for another custom request. My client requested a jewelry box to keep all her large beaded jewelry and rings & things, so this box is going to be larger than usual. She also requested a custom make up box so that she could have easy access to all her make up.
With these boxes I will try something that I haven't tried before and that is an inlay technique. I will be inlaying a raven design onto the lid of the box. This raven image has special meaning to the client, since she took the the photo of the raven herself.
As usual and with good practise, I start out with the design process by first making a few sketches of what the box will look like and a drafted drawing. I also made a very quick and rough mock-up of the box, to easily visualize the proportions of the box. I gave my client three choices of box styles and she ended up choosing the more traditional prairie style box design. This design will have a shaped bottom, dovetails for the joinery and a lock. The make up box will essentially be the same design, but instead of a lock, this box will have a simple latch.

After I have made all the necessary drafting and was happy with all the proportions of the boxes, I jumped right into preparing the boards for the construction of the boxes.


After all the boards are broken out into the final dimensions I prepared to make the dovetail joinery, by laying out all the necessary lines. Accurate layout of the lines are very important, because all your cuts will be determined by these lines. An easy way to lay out these lines is with the aid of a dovetail marking gauge. The beauty of this gauge is, is that you can mark out the angle of the dovetail as well as the 90 degree lines in one motion, so no more fumbling with your bevel gauge and square. A marking gauge easily marks the thickness of the corresponding piece.

In the next part I will be cutting the dovetail joinery by cutting the pins by hand and I will also use the table saw to cut the tails.

Thanks for looking!

Roshaan