Gallery

22 November 2010

Alberta Rose Recipe Box - Part 7 final

Hi Everyone!

Well, this is it! Finishing time!


I have treated the inside of the box a little bit differently than the outside. I applied several coats of a water based brush on finish on the inside and on the outside of the box I applied 5 coats of a penetrating oil finish. I do this solely because the oil finish have a tendency to maintain a lingering unpleasant odour when it is applied to an enclosed space, such as the insides of boxes, drawers and cabinets.

I choose to treat the outside of the box with a penetrating oil finish, because it brings out the natural grain and color of the wood and leaves the surface with a nice hand-rubbed finish.
After I waited for the box to cure for about a week, I replaced all the hardware and attached some clear pads on the bottom of the box to finish it off.
That is it for this project! I think it turned out great. Please come back next time for the reveal.
Thanks for looking!
Roshaan

Alberta Rose Recipe Box - Part 6

Hello,

In this part I will concerntrate on finishing off the box, by doing some final sanding, attaching hardware such as the brass stop hinge, the latch and also attaching the solid brass handle.


In the last part I cut away the lid from the box bottom. Since I left that little sliver I had to complete the seperation by using a handsaw. The picture above shows the seperated parts, with the rough edge left behind.

The way I clean the rough edge left by the handsaw, is by roughly flushing the egde with a chisel or block plane and then cleaning the edges further with sandpaper. My trick for getting a perfectly flat edge is the take the piece to sandpaper instead of taking sandpaper to the piece. I simply attach a full piece of sandpaper to a perfectly flat surface by using temporary bond spray adhesive. You could use a flat board of mdf or better yet a piece of thick glass.


After all the edges of the lid and box bottom were sanded flat, I then routed a shallow recess to house the stop hinge. I mark the outline of the hinge on the edge by using a sharp marking knife. I then free hand the recess using a palm router with a straight bit, staying well away from the layout lines. Finally I square the recess with a chisel.


After the hinge is attached I then find the center of the front of the box. This will help me position the latch right on the center line. The nice thing about this type of latch is, it has points which lined up nicely on the center line.


Finally I positioned the handle on the lid and drilled holes for the screws. I made sure I clamped a scrap block of wood on the inside of the lid, to prevent the drill bit from causing awful tearout as the bit exits the other side.
Hang in there! We're almost there!
In the 7th and final part of this project I will be applying a finish to the box, so please return!
Thanks for looking!
Roshaan


Alberta Rose Recipe Box - Part 5

Hi Everyone!


Well it's glue-up time! A time when you really see what your joints are made of...or maybe how well your joints are made. In this part I will demonstrate a stress-free way to glue the box joints of the recipe box...well maybe a LESS stressful way to glue-up box joints.


Since there are so many glue surface points when using box joints, it can get a little bit stressful when you have to apply glue to so many surfaces in such a short amount of time. And when you have to bring 4 sides together it can get downright ugly! That's the reason why I do my glue-up in stages. Sure it takes a bit longer, but trust me you'll have your sanity still in tact at the end of it all! And a sane woodworker is a happy woodworker :)
I first made some clamping aides or blocks and it is basically a mitered block fastened to a piece of scrap board as seen above. These aides allows me to bring clamping pressure to the corners where it is most needed.

The photo above shows both sub-assemblies glued and cured.


Now the beauty of this method of glue-up is that I only have 2 corners to worry about instead of 4! The final assembly came together in a snap! Just the way I like it!


After the final assembly is taken out of the clamps I flush the excess material of the box joints using a sharp chisel.


After the box joints have been flushed and the all the box sides have been cleaned up with various grits of sandpaper, I then cut the top away using the tablesaw. Just as I have done in an earlier project, I leave just a sliver of wood to be cut away later with a handsaw.
Well we are almost there! Please come back for part 6!
Thanks for looking!
Roshaan


11 November 2010

Alberta Rose Recipe Box - Part 4

Hi All,

In this part of the project I will focus on scrolling out the rose design. I will be using the drill press equipped with a 1/16" diameter drill bit to drill the blade entry holes. I will also cut a walnut backer piece to insert into the recess that was routed out in part 3. So let's get started!


As you will soon see, all interior cuts in a particular pattern or design requires a hole for the scroll saw blade to be threaded through. This rose design is no different. I do recommend that you use a drill press instead of a hand held drill to perform this task. A drill press will give you much better accuracy and ensures that the hole is drilled at a perfect right angle to the work piece. This accuracy is very important with a delicate design such as this. I always use a scrap backer piece to prevent awful tearout at the back of the piece.

For this design I used a # 2/0 blade since the cuts are so fine. I always like to start with the most delicate cuts first, if at all possible. It's always a good idea to leave larger surface interior cuts for the very last.


Voila! Here we have the finished rose cut-out! Not too shabby huh?


Now to the back of the cut-out. Remember the recess I cut in an earlier part? Well now would be a good time to fill it. I cut a nice piece of contrasting walnut to the exact dimensions of the opening on the tablesaw.


However, before I was ready to glue it in place I had to clean up the back of the cut-out. I simply got rid of any burrs by giving the back a light sanding with 220 grit sandpaper.
Well that's about it for this part. Please return for part 5 of the Alberta Rose Recipe Box, when I will be ready for the big glue up!
Thanks for looking!
Roshaan


Alberta Rose Recipe Box - Part 3

Hi Everyone,

I am making great progress on the recipe box. In this part I will share how to rabbet the top and the bottom parts. Also how to create a routing template to rout out a recess on the inside face of the front part of the box. And finally how to transfer the rose pattern onto the front.


Since we have cut grooves on the inside faces of all sides in part 2, we will be cutting rabbets onto the top and bottom parts to slip into those grooves. The rabbets are simply cut on the table saw using a dado stack and an auxillary wooden fence. I use a wooden fence so that I can bury the dado blade under the fence to get a clean and accurate rabbet.
Since I wanted the rose cut-out to pop, I had to figure out how to introduce a contrasting backer piece to the front. I could have simply applied a full piece of contrasting wood to the inside, but then you will be able to see the contrast on the top edge of the box when it is opened. I wanted a clean and crisp look to all the edges of the box. The best solution was to rout a recess on the inside face of the front where the rose design will be cut. This is easily done by using a routing template, a router, a straight bit and a template guide and bushing set. First I made a simple template out of 1/4" thick mdf. The method pictured above is the most accurate way to create a perfectly square recess.

I then used double stick tape to attach the template to the front piece of the box. I made sure to attach the template to the inside face of the front. I proceeded to rout the recess moving the router in a clockwise direction. I also made sure to make a couple shallow passes, instead on one deep one, which will cause the router and the bit to work extra hard and be a more dangerous operation.

After I made sure that all the routed edges of the recess was nice and smooth without any bumps, I carefully removed the template. I squared up the rounded corners of the recess with a chisel.


I then transfered the edges of the recess with a pencil and square to the outside face of the front. This gave me a reference point for careful placement of the rose pattern. I then used carbon paper to transfer the pattern onto the front. I also had to keep in mind the placement of the latch when I transfered the pattern.
Well that's it for part 3! Please join me next time for part 4!
Thanks for looking!
Roshaan


03 November 2010

Alberta Rose Recipe Box - Part 2

Hi All,

The joinery has begun on the recipe box! After I cut the parts to length, I made a simple finger joint jig, which easily attaches to the table saw miter gauge.


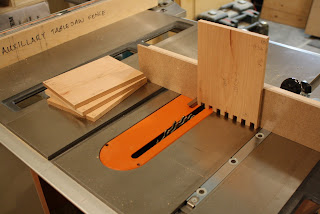
The jig is made up of a hardwood pin which sits into a notch of the same thickness made in the miter gauge auxillary fence. Although the jig is simple to make, it is very critical to get all the elements to allign. To get successful results it is important that the pin, the space in between the blade and the pin and finally the dado stack is the exact same width. Any variation to any element will result in the joints being too loose or too tight.

Another critical part is to make sure to clearly and carefully mark which way is up, sideways bottom, top...well... if it is something that will help you with the orientation of the piece mark it! It is very easy to get all the parts confused and cut a notch where a pin should be. Believe me this leads to some choice words with yourself about yourself!


I first start by cutting a pin on the edge of one part by butting the board up against the hardwood pin of the jig as seen in the second photo from the top. After this board is completed, I then start on the corresponding corner of the next board with a notch. I simply use the first board to create the space in between the hardwood pin and the dado stack and then butt the second board up against it. And so on.
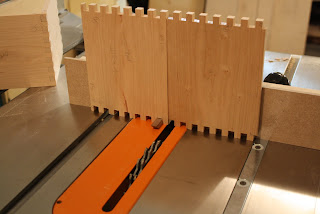
After all the finger joints were cut, I then proceeded to cut the grooves at the top and bottom edges of each piece. I had to keep in mind the placement of each pin and notch.
If there was a notch I could simply run the piece right over the blade to create the groove, because the groove will be hidden by the pin. However if there was a pin, I had to cut a stopped groove, because unfortunately this groove can't be hidden. You will be able to see in on the outside face of the box. See detail photo above.
Well, that's it for this part. Come by next time for part 3!
Thanks for looking!
Roshaan


02 November 2010

Alberta Rose Recipe Box - Part 1

Hi Everyone!

The next project I will be working on is a sweet recipe box which will hold standard 4" x 6" cards. It all started with a request to upgrade a current recipe box and to personalize it with a monogram J surrounded by an Alberta rose. The Alberta rose is a wild rose and it is the official foral emblem of the Province of Alberta in Canada, where my client resides.


I presented a couple of sketches to my client and she chose the one pictured above. I think it will add a great focal point to the front of the box. The box will be made out of cherry wood, which will age beautifully. The box corners will be joined with finger/box joints and I will show you how that is done using the miter gauge and a simple jig on the table saw. The box will be topped with a solid brass flip handle and a fancy brass latch on the front of the box will secure everything inside.


With every project I "sticker" the project lumber and allow it to acclimatize to the workshop for at least 3 days. Sticker is just a fancy word for the sticks in between each layer of wood. This just allows air to reach both the top and bottom of the boards.

In the next part I will cut the parts to length and start with the joinery, so please stop by for part 2.

Thanks for looking!

Roshaan